Saturday 13 October 2012

Where have I been

Good Morning Everyone!

I have finally started to get back on track.  I wanted to let anyone who is following my blog know that I have been having a few hiccups over the last 6 weeks.

I am told things happen in three's.

I have experienced a few set backs which have put my blog and my craft on hold.  It started with having to be tested for the second time round for breast cancer.  This was obviously very stressful and consumed my every thoughts for a good few weeks.  I am however blessed! I  am a lucky girl and have been given the all clear.

To all the beautiful women out there who are not so fortunate I send my love, strength and compassion your way.  I can't imagine the struggle you must be going through. The what if's and the possibility of being faced with such a terrible disease is very overwhelming and daunting. I was terrified for my children.

After I was given the all clear I was then faced with a car accident.  A drunk driver hit the back of my car.  Again I was lucky.  My car was obviously damaged however I think I was meant to be at the intersection where the accident took place.  If I had not been there the women who hit us would have surely gone straight through the lights and killed someone. She was extremely intoxicated so much so she spent the night in jail and ended up with the maximum charge for drug and alcohol usage.
It was 7.30 in the evening and the intersection was extremely busy.  So for the sake of a vehicle I am glad I was there.  Sometimes out of something bad comes a wonderful positive. The possibility that a life was spared!

My partner and I did end up with a very sore back and neck but hey time heals all so they say! Again I was lucky and my children where not in the vehicle to witness any of this.

I do not drink so me this was particularly upsetting.

Lastly we where put under pressure and had to move house.  So after a lot of packing boxes, a bit of de-cluttering we have relocated to a new home.  A larger property where my beautiful animals are loving it. Especially my dogs! They have space and freedom to explore.  My children are also extremely happy!

Looks like I might be finally back on track!

I will be hoping to post a project shortly.

Thank you so much for your patience.


Hugs

XXX
Fiona xxx

Tuesday 3 July 2012

Good Morning Everyone!

I thought I would post a few photographs that my partner Bill has taken.  He has recently started taking photographs and I really love them.  He has always been interested in Photography and I thought this would be a great way to encourage him to do something he loves.

I really love these. He now has his own blog! Through Bill's Eyes.


I hope you like them!

UPDATE : I would also like to let my followers know that I am changing things around a bit. Because my website is still a work in progress and I am working hard to get this up and running things haven't gone quiet to plan with blogging so I will only be posting tutorials fortnightly. And anything else like cards, scrapbooking layouts etc I will be posting as and when I get the opportunity. This will only be temporary until my website is sorted.  Thanks for taking the time to share my ideas and creations! I hope life is being kind to you all!

Hugs

XXX
Fiona xxx


Sunday 24 June 2012

Good Evening Everyone!

This is my latest card for Scrappy Go Lucky. 


I have used the Mermaid Marci Stamp from La La Land and coloured her using Copic Markers.
For the full tutorial pop over to Scrappy Go Lucky's Blog.

Remember to join me next week when I give a detailed tutorial on how to make a shaker card using the stamp from Sweet Pea Stamps by Conie Fong Temptation.


See you next time and thanks for taking the time to share my creations!


XXX
Fiona xxx

Saturday 23 June 2012

Morning Everyone,


Just an update.  I have completed my tutorial for Copics however just having a few technical problems at the moment.  So if I can ask you to bare with me.  Trying to get it sort out now.  I should hopefully have it sorted shortly.


In the meantime I thought I would share my the latest stamp I have coloured with Copic Markers.  This is a Sweet Pea Stamp by Conie Fong called temptation. Very cute little image. I will be doing a tutorial with this one next week.  I will be using it for a shaker card. So I hope you will join me for this one.

Hope you are all having a wonderful weekend!


Hugs XXX
Fiona xxx

Thursday 14 June 2012

Tutorial Thursday with Scrappy Go Lucky

Good Evening Everyone!


Just an update with Tutorial Thursday with Scrappy Go Lucky. Things will be a little different with the Copic tutorials I will be posting for Scrappy Go Lucky. Unlike previous tutorials  I will put the full tutorial on Scrappy Go Lucky's Blog to begin with. At the same time I will  be asking followers to head over to my blog to have a look at the finished projects I make on completion of my tutorial.

After posting the tutorials with Scrappy Go Lucky around a week or so later I will then put the full tutorials on my Tutorial Page of my blog for my followers to refer back too. This will take place as from next Thursday.

Also keep an eye out for my tips, techniques and tutorials for other projects and ideas that I will be posting on Inspirational Tips, Techniques and Tutorials. To begin with I have posted my 3D Card Tutorial I originally posted on the 14th May 2012. This is a wonderful blog with so many projects, ideas and techniques.


Hugs

XXX


Fiona xxx

Wednesday 13 June 2012

What's Up Wednesday


Good Morning!

We have been experiencing terrible weather at the moment.  Strong winds, rain and more rain!!!

I hope you are all well and stay safe!


And when it rains on your parade, look up rather than down. Without the rain, there would be no rainbow.

Gilbert K. Chesterton


Hugs XXX

Fiona xxx


Tuesday 12 June 2012

Talented Tuesday with Shauna

Good Evening!


For Talented Tuesday I am posting something so cute from a gorgeous person and lovely lady named Shauna.

She made me this as a gift.  I loved it.  It is a milk carton and crate.  Inside she filled it with brads and
M & M's.  I proudly display this in my scrapbooking and crafting room. Of Course the M & M's are long gone!

I loved receiving this gift. It is so lovely! I hope you love this as much as I do!!!!


Hugs


Fiona xxx

Make it Monday - Chocolate, Coffee & Card Challenge

Good Evening! 

This is my latest card for Make it Mondays. Unfortunately I was unable to post it yesterday due to bad weather and internet trouble. So while we have electricity before a new storm heads our way I thought I would take the opportunity to quickly post my card. I am entering it into the Chocolate, Coffee and Card Challenge!


Challenge Number 14 - Photo Inspiration.


For my card I have used a Kenny K stamp, Troublemaker! I particularly like these images they are cute and so much fun to colour! To colour my card I have used Copic Markers.  I hope you like this one!  I love the colours of the photo inspiration!

Hugs  

Fiona xxx


Friday 8 June 2012

Good Afternoon!


Just an update that I should be back up and blogging for Monday!  I have been dealing with a few things my end!  Health, Family and School! To my followers I would like to apologise for keeping you waiting and thank you kindly for taking the time to follow my blog! I hope life is being kind to you all and treating you well!


May the road rise to meet you,
May the wind be always at your back,
May the sun shine warm upon your face,
The rains fall soft upon your fields and,
Until we meet again,
May God hold you in the palm of His hand.

 "Irish Quotations"


Hugs


Fiona xxx

Saturday 19 May 2012

Good Afternoon!

As you can see my blog is getting a make over.  I am so excited I have actually managed to work out how to make the banners myself.  So now I can up date and change my blog regularly.

This is what has been keeping me busy for the past week. Updating my blog and sorting my website.

Hope you like the changes I am making.  The digital images in my banner are both my own, my children's and I have also incorporate a few from Trina at Digi Scrap Kits. The banner background is from Basic Grey.  These are one of my favourite papers to use for scrapbooking.

Hope you have a wonderful weekend.

Hugs

Fiona xxx

Monday 14 May 2012

Make it Monday! 3D Tutorial

Good Morning!

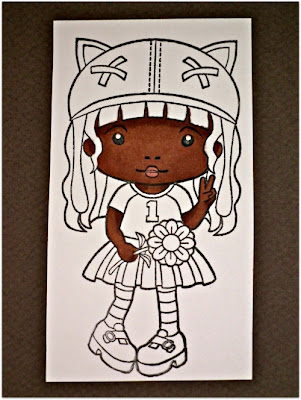
It's Monday and for Make it Monday I have a tutorial for you on creating 3D stamped images for your cards or projects. For this particular piece I have used a La La Land stamp Kitty Kat Marci.

STEP ONE:  You will need to stamp your image a number of times. For this project I have stamped my image four times in total.  (Three stamps I used to colour for my pop up areas and these will be cut up and the last stamped image I used for the base of my stamp). If you are using digital stamps then print your image a number of times.  To begin with you will need to colour the areas on your stamp that you wish to raise and have popped up, these areas will all be cut out.  This is shown in the photograph below.


For my first areas I have coloured the hat, top and skirt on Marci.


For my second areas I have coloured the ears and crosses on Marci's Hat, the details on her shirt, shoes and the flowers centre.


For the final area to be raised on my stamp I have coloured the flower.


STEP TWO: Once you have coloured each area that you wish to raise you then need to cut them out. This is a little time consuming however it is absolutely worth it as the end result looks wonderful. You can either fussy cut with scissors or you may like to use a craft knife. I prefer the scissors, however it is personal preference.


STEP THREE:  For the base of the image which is the fourth image stamped you then need to colour the rest of Marci these areas are what will remain flat and will be the base for which you will stick the pop up pieces. So in this case I coloured her hair, face and her stockings.  You will notice that I have then coloured all the other areas black.  This is the base for my pop up areas. I have coloured them black as it gives a more finished and professional look when the image is all finished.


This is a close up look of your main completed base stamp of Marci and how it should look just before you are ready to assemble and stick all your raised coloured sections on.


This is what you should start with when ready to stick all your pieces together. To complete your project each cut out coloured area is then stuck on your main completed stamp. 


This is Marci all stuck together. I find zots glue dots the best option for this project. However you can use what you have available. Any 3D glue or sticky dots will work fine.


A close up view of Marci raised. I have cut her out completely to finish the stamp off nicely.


STEP FOUR: Its now time to assemble your completed project on card stock or whatever you wish.  I have chosen to do a sweet little note book for my daughter.


For my completed project I have chosen a blue, red and lemon colour scheme. I have sewn my papers together and used red, white and lemon flowers, blue satin ribbon, pearl accents, a smile embellishment and red brads to complete the notebook!


I hope you like it.  This is particularly fun to do and the end result is so cute! I have linked my final piece to the La La Land Craft Gallery.

Hope you have a wonderful week.

XXX

Fiona xxx


Thursday 10 May 2012

Scrappy go Lucky Copic Tutorial - Skin Colour Basics #2


Good Evening!  It's Tutorial Thursday....


If you have been following along with my tutorials for Scrappy Go Lucky welcome Back.  I firstly apologise for the delay in the posting this tutorial I have been unwell.


This is a follow on from my Skin Colour Basics # 1 tutorial.
With my skin colour basics # 1 tutorial I focused on the basic colouring techniques and tips for Caucasian skin tones. In this tutorial I will be showing you some colour range options for skin tones:


For full instructions on how to colour with Copic Markers please refer to my previous skin tutorials for tips. Skin Colour Basics # 1. With this tutorial I am providing examples for colours that I have used for three different skin tones, Dark African skin, Hispanic skin and Asian skin.


For the following examples I am using the Kitty Kat Marci stamp from La La Land.


Dark African skin tones:  I have used the following Copic Markers E25, E27.


Step One: Begin by colouring the whole stamped image skin area with the base colour E25. 

TIP: Remember to colour in a circular motion when using the Copic Markers as an all over colour.


Step Two: Using the E27 highlight under the hair line and around the cheek area and at the top of the arms to create depth. For each of the examples I am using a central light source. ( Stay tuned for future tutorials on light and shadows ).


Step Three: To complete the skin area of your stamped image use R02 or R83 for cheeks and lips.  BV23 is then used to create a realistic shadow and provide depth to your image.


Step Four:  Finish colouring your stamped image.

Hispanic:   With the next example I have used the following Copic Markers E13, E15.


Step One:  Again begin by colouring the whole stamped image skin area with the base colour E13.


Step Two: Using the E15 highlight under the hair line and around the cheek area and at the top of the arms to create depth. Again I am using a central light source. 


Step Three: To complete the skin area of your stamped image use R02 or R83 for cheeks and lips.  BV23 is then used to create a realistic shadow and provide depth to your image.


Step Four: Finish colouring your stamped image.


Asian:  For my final example I have used the following Copic Markers E53, E42, E41.


Step One: Begin by colouring the whole stamped image skin area with the base colour E41.


Step Two: Using the E53 and E42 highlight under the hair line and around the cheek area and at the top of the arms to create depth. For this stamped image I am using a central light source.


Step Three: To complete the skin area of your stamped image use R02 or R83 for cheeks and lips.  BV23 is then used to create a realistic shadow and provide depth to your image.


Step Four: Finish colouring your stamped image.

I like to use BV23 for shadows to help give a realistic shadow and tone to the skin.


For cheeks I like to use R02 or R83.


These are skin tones that I have played around with however I would like to point out that there are a number of combinations for skin colour.  I suggest experimenting, apart from being extremely relaxing, it's fun and this way you can find a tone that suits your project. Here are a few other skin combinations you might light to try are:


African American: E23, E25, E31, E33, E35

Native American: E13, E15, E17

Caucasian Olive skin tones: E02, E11, E21, E51

Caucasian baby skin tones: E000, E00, R20 blush


Here is a sneak peak of another one of my completed projects I made with this stamped image Kitty Kat Marci from La La Land!  Join me again on Monday for Make it Monday's where I will show you in step by step instructions how to create a 3D stamped project.


Hugs


Fiona xxx