

Good Evening Everyone!
It's time for a Copic Tutorial with Scrappy Go Lucky.
Today I will be focusing of colouring Hair. For this tutorial I am using a La La Land Stamp simply because they are larger in size and help to show technique a little easier than smaller stamps however I do want to point out that the tutorials tips and techniques do apply to any stamp that you might wish to colour.
The stamp I am using is Mermaid Marci.
The first thing that you need to remember when colouring hair is to colour in the direction that the hair is falling or flowing. You also need to keep in mind the light source that you have chosen to use and start colouring with this in mind. Chose what colour your hair is going to be. For my image I have gone with blonde. In later tutorials I will provide colour options and look at how to colour other hair colour such as black hair.
The colours I will be using for this image are Y0000, Y00, Y02, E71, E74, E23 and E27.
Begin with the lightest colour that you wish to be highlights. In my case I have used Y0000.
Remember to keep the colouring and strokes fairly light and make sure you colour in the direction that the hair is flowing or appears to be moving. To create a realistic look flick and taper the brush stoke off.
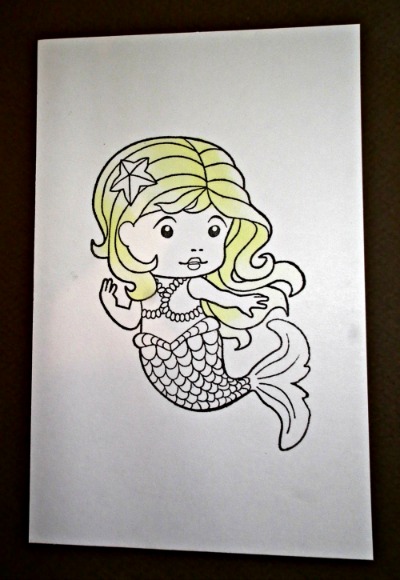
Next I use my next colour which is Y00. As you did previously place colour in the areas which you wish to be darker and start creating shadow and depth. At this point I will remind you that as you go all areas will be covered. Darker colours are added as we go. Although some do like to leave areas of white I do not do this. I think a more realistic effect is if the whole image is coloured. When you look at highlights in our own hair the lightest areas still have colour. Therefore to me it only makes sense that the image should have light coloured highlights not white.
The next step is to repeat the same process with your next colour. In my case my next colour is Y02
By adding the next layer of colour you will start to get texture. Again each stroke that you make needs to follow the direction of the hair.

Next take E71 and start to fill things out a little. By repeating the same steps adding more colour you are slowly building texture and depth to your image. You can see that the hair has now got a life of its own and has a texture to it.

You then continue with E74 using the same technique you are slowly building up colour and adding texture to the hair.

Lastly take your E23 and E27 and using the same light tapering or flicking brush strokes and extra highlights. Keep these as lose as possible.

The end result should be something like this!

I hope you enjoyed my tutorial!
Happy Crafting!
Hugs
Fiona xxx
Good Morning!
It's Monday and for Make it Monday I have a tutorial for you on creating 3D stamped images for your cards or projects. For this particular piece I have used a La La Land stamp Kitty Kat Marci.
STEP ONE: You will need to stamp your image a number of times. For this project I have stamped my image four times in total. (Three stamps I used to colour for my pop up areas and these will be cut up and the last stamped image I used for the base of my stamp). If you are using digital stamps then print your image a number of times. To begin with you will need to colour the areas on your stamp that you wish to raise and have popped up, these areas will all be cut out. This is shown in the photograph below.

For my first areas I have coloured the hat, top and skirt on Marci.

For my second areas I have coloured the ears and crosses on Marci's Hat, the details on her shirt, shoes and the flowers centre.

For the final area to be raised on my stamp I have coloured the flower.

STEP TWO: Once you have coloured each area that you wish to raise you then need to cut them out. This is a little time consuming however it is absolutely worth it as the end result looks wonderful. You can either fussy cut with scissors or you may like to use a craft knife. I prefer the scissors, however it is personal preference.

STEP THREE: For the base of the image which is the fourth image stamped you then need to colour the rest of Marci these areas are what will remain flat and will be the base for which you will stick the pop up pieces. So in this case I coloured her hair, face and her stockings. You will notice that I have then coloured all the other areas black. This is the base for my pop up areas. I have coloured them black as it gives a more finished and professional look when the image is all finished.

This is a close up look of your main completed base stamp of Marci and how it should look just before you are ready to assemble and stick all your raised coloured sections on.

This is what you should start with when ready to stick all your pieces together. To complete your project each cut out coloured area is then stuck on your main completed stamp.

This is Marci all stuck together. I find zots glue dots the best option for this project. However you can use what you have available. Any 3D glue or sticky dots will work fine.

A close up view of Marci raised. I have cut her out completely to finish the stamp off nicely.

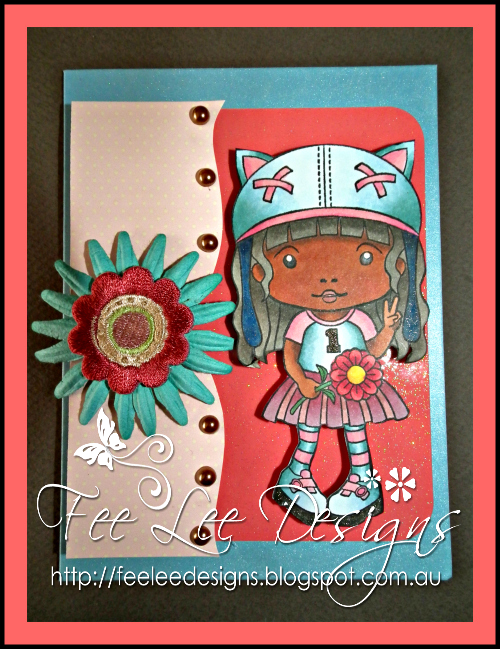
STEP FOUR: Its now time to assemble your completed project on card stock or whatever you wish. I have chosen to do a sweet little note book for my daughter.


For my completed project I have chosen a blue, red and lemon colour scheme. I have sewn my papers together and used red, white and lemon flowers, blue satin ribbon, pearl accents, a smile embellishment and red brads to complete the notebook!


I hope you like it. This is particularly fun to do and the end result is so cute! I have linked my final piece to the La La Land Craft Gallery.
Hope you have a wonderful week.
XXX
Fiona xxx

Scrappy go Lucky Copic Tutorial - Skin Colour Basics #2
Good Evening! It's Tutorial Thursday....
If you have been following along with my tutorials for Scrappy Go Lucky welcome Back. I firstly apologise for the delay in the posting this tutorial I have been unwell.
This is a follow on from my Skin Colour Basics # 1 tutorial.
With my skin colour basics # 1 tutorial I focused on the basic colouring techniques and tips for Caucasian skin tones. In this tutorial I will be showing you some colour range options for skin tones:
For full instructions on how to colour with Copic Markers please refer to my previous skin tutorials for tips. Skin Colour Basics # 1. With this tutorial I am providing examples for colours that I have used for three different skin tones, Dark African skin, Hispanic skin and Asian skin.
For the following examples I am using the Kitty Kat Marci stamp from La La Land.
Dark African skin tones: I have used the following Copic Markers E25, E27.

Step One: Begin by colouring the whole stamped image skin area with the base colour E25.
TIP: Remember to colour in a circular motion when using the Copic Markers as an all over colour.

Step Two: Using the E27 highlight under the hair line and around the cheek area and at the top of the arms to create depth. For each of the examples I am using a central light source. ( Stay tuned for future tutorials on light and shadows ).

Step Three: To complete the skin area of your stamped image use R02 or R83 for cheeks and lips. BV23 is then used to create a realistic shadow and provide depth to your image.

Step Four: Finish colouring your stamped image.
Hispanic: With the next example I have used the following Copic Markers E13, E15.

Step One: Again begin by colouring the whole stamped image skin area with the base colour E13.

Step Two: Using the E15 highlight under the hair line and around the cheek area and at the top of the arms to create depth. Again I am using a central light source.

Step Three: To complete the skin area of your stamped image use R02 or R83 for cheeks and lips. BV23 is then used to create a realistic shadow and provide depth to your image.
Step Four: Finish colouring your stamped image.
Asian: For my final example I have used the following Copic Markers E53, E42, E41.

Step One: Begin by colouring the whole stamped image skin area with the base colour E41.

Step Two: Using the E53 and E42 highlight under the hair line and around the cheek area and at the top of the arms to create depth. For this stamped image I am using a central light source.

Step Three: To complete the skin area of your stamped image use R02 or R83 for cheeks and lips. BV23 is then used to create a realistic shadow and provide depth to your image.

Step Four: Finish colouring your stamped image.
I like to use BV23 for shadows to help give a realistic shadow and tone to the skin.
For cheeks I like to use R02 or R83.
These are skin tones that I have played around with however I would like to point out that there are a number of combinations for skin colour. I suggest experimenting, apart from being extremely relaxing, it's fun and this way you can find a tone that suits your project. Here are a few other skin combinations you might light to try are:
African American: E23, E25, E31, E33, E35
Native American: E13, E15, E17
Caucasian Olive skin tones: E02, E11, E21, E51
Caucasian baby skin tones: E000, E00, R20 blush
Here is a sneak peak of another one of my completed projects I made with this stamped image Kitty Kat Marci from La La Land! Join me again on Monday for Make it Monday's where I will show you in step by step instructions how to create a 3D stamped project.
Hugs
Fiona xxx
Scrappy go Lucky Copic Tutorial - Skin Colour Basics # 1
Good Morning Everyone!
If you are following along welcome back. If you are new to my blog I hope you enjoy it and find it helpful!
Today I am doing the first of many more in-depth tutorials for Scrappy Go Lucky on how to colour with your Copic Markers. This tutorial will be covering the first tutorial for colouring skin. For the purpose of this tutorial I am using Copic Sketch Markers. The Markers used will be E00 and E11. Followed by RV10 for cheeks and lips.
Step One : To begin with you will need to select the image you wish to colour. I am using the Beach Marci stamp by La La Land. This is a cute little image and fun to colour.

Step Two: In my tutorial I will be using only two colours. The general rule when working with Copics is that you need to work with three colours in order to get the best results. I do find that sometimes there is an exception to this rule and I like to experiment. When colouring skin I have found that you can use just two colours and will still get a wonderful tonal skin effect. You can use these two colours and layer them to look as though you have in fact used more colours and still create the depth and dimension required to bring the image to life. This is especially helpful if you are just starting out with Copic Markers. So I am going to show you how you can achieve a great result using just the E00 and the E11 in the Copic Range.
To begin you will need to colour the face area with the base colour that you are using. In this case I am using the lightest colour E00 as the base colour.
TIP: Remember to colour in a circular motion when using the Copic Markers as an all over colour. This helps to give an even coverage. Also remember the tip of your Marker should never be bending. This means you are colouring too hard.To prevent this hold your marker slightly at an angle.

STEP THREE: Once you have coloured the face you can then start on the other skin areas, neck, arms, hands and legs. After the complete skin area is covered it you will need to decide where the shadows will appears on your image.
For my stamp I will be doing a centre light source. ( Imagine the sun is shining straight on his face front on). This will mean that the centre of his face, front middle of the legs and the front of his hands will appear the lightest. This is where the highlights will be.

STEP FOUR: Its now time to begin to highlight. I like to begin by starting with one side of the image at a time. It is now that you change your colouring technique and use a flicking/feathering brush stroke. Remembering to start from the outside edge of your image and flicking/feathering in towards the centre of the face. I also like to break it down into sections. I will do the face first, then the neck area, followed by the arms and hands, then the legs. It tends to make it easier and I can allow each section to dry whilst I carry on to the next. Always going back and making any changes if I need too. Using E11 I start to flick/feather my marker inwards.

STEP FIVE: You place your highlights using E11 to the left of the face and to the right of the face and to the top of the hair line.

STEP SIX: Now using light strokes with the E00 blend your E11 from where the colour just finishes. Do not colour completely over the entire E11 area. The reason for this is you will change the E11 colour and it will appear washed out. Use very light flicking/feathering strokes. You will notice that the image still appears patchy and wet therefore you need to allow this area to dry.

STEP SEVEN: You can now move on to the neck area. As you did with the face use E11 to highlight just under the chin area. Allow it to dry and move on to the arms and hands.

STEP EIGHT: With the arms and hand area highlights are place at the top of the shoulders and along the tips of the fingers. The rest of the areas remain highlighted in the lighter E00. Remember that the light source is coming from the centre or front of the image so the arms will be darker near the neck and shoulder area and the hands will be darker at finger tips near the bottom. With the front middle section appearing lighter and highlighted. Allow this area to dry and move on to the legs.

STEP NINE: The legs are highlighted using E11 at the top just under the swimming costume and near the ankles on both feet. The front of the leg is what appears highlighted.

STEP TEN: Go back over each step starting with the face, followed by the neck, arms, hands and legs using the same flicking/feathering techniques. Re do the dark E11 area first followed by the E00 blending as you go. This will slowly build your image to give depth and dimension.
TIP: Never colour light over dark always using the light colour to move the dark colour away from an area.


STEP ELEVEN: Once you are happy with your result you can then using the RV10 marker to and blush to your images cheeks, lips and any extra highlights. To apply blush to the cheek area use a light circular motion. If there is too much colour use the E00 to blend outwards. Flicking/feathering colour away from RV10 area blending with the flicking/feathering technique inwards to centre of the face.


Now that the skin area is completed you can move on to the next section of the image. Like the costume, hat or hair.

Stay tuned for my next tutorial on skin!
For my completed image I coloured it using the following markers.
Swimming costume and Hat: YG61, YG63, G46, Y000, Y00, Y02, Y35 and Y38.
Swimming tube: YG61, YG63, G43 and G46.
Flowers on hat and tube: R37, R39, R56 and Y02, Y35, Y38.
Hair: N1, N9, N10, and E71 for tone and B99 for Depth.
Colourless blender also used for corrections.
I like to pick the card stock and colours as I go.

My finished piece!


I have used navy blue card stock for the background colour and navy blue die cuts to make water splashes. Which have been highlighted with glitter to give a water effect. Yellow card which I have used a paper punch to scollop the edges. The black and white polka dot paper is adhesive paper prints from DCWV. The green checkered paper is from Making Memories Embellishment paper Kids Collection. And the chipboard SUN letters are K.Ology from K&C Company.
Hope you like it!
Hugs
Fiona xxx
Scrappy Go Lucky Tutorial for Beginners
Hi Everyone!
Today I am doing my first of many tutorials on Copic Markers for Scrappy Go Lucky. I first would like to say although I am not a Certified Copic Marker Designer. I do have my certificate/Diploma in Art and Design. And I am currently half way through my Bachelor of Art and Design. So with this in mind I would like to give you an idea of how I like to colour with Copic's using the Marci Ruffles Stamp by La La Land.
I am beginning with a basic tutorial on how to colour and blend with Copic Markers. For those Copic users who already are familiar with the basics please feel free to take a look. Fresh ideas can sometimes spark your creativity.
To begin with you stamp your image onto your Copic blending card using Memento black ink.
Its a good idea to place a piece of scrap paper under your image before you begin to colour. That way any bleeding that occurs from your markers goes through onto your scrap.
Then you will need to select what colours you wish to use for your stamped image. For this demonstration I have used Copic Sketch Markers.
Colours used: G43, G46, Y28, BG70, BG72, Y00, Y02, Y35, Y26,, Y28, E000, E00, E02, E11, BV02, RV32.

To begin with I completely colour Marci's ruffle top and head band using G43. (Each marker has a colour coded number on the Marker e.g. G43)
TIP: Remember to use circular motions when colouring to give more even coverage.

I then use G46 to create shadows. I use a flicking/feathering technique with the brush tip.
TIP: Hold and flick your Copic brush tip away from your body, using small brush strokes.
Use G46 on the straps of her top under her chin area and along the middle of the ruffles on her top. Once you have done this use G43 to colour over the complete area to to blend the colours together. This same technique is used for the head band and shading on the head band above both her ears. G46 to Highlight and G43 to blend entire head band.

To make the ruffles stand out even more I used Y28 over the top of each highlighted area. This creates further dimension on both the ruffles and head band. I then use the colourless blender to remove the smallest amounts of colour on the mid section of the head band and in between each ruffle. This helps to start to make Marci come alive. Once you have done this using a slight flicking motion with G43 to blend these areas. Once you are happy you can move to your next area to colour.
TIP: Don't forget you can use your chisel end of your colourless marker to correct any little mistakes you have made by gently pushing the colour towards the area in which you wish the colour to go. Allow the area to dry each time you do this step.

Before continuing to colour I like to match my card stock and any papers I might be using. This is a personal choice. Some crafters like to do this once their completed. However I find it easier and a little more fun to do this at the start. It gives me inspiration whilst I am completely my project.

For the skirt and shoes I have used BG70 as the first colour applied to my stamped image.

To give that shading and dimension needed to the skirt and shoes I have used BG72. Once you have shaded the areas use BG70 to blend both colours together and create a softer look.
I have also used BG18 very lightly along the same areas as BG72 this gives further dimension to Marci's skirt and shoes.
TIP: If you look closely at the top of Marci's skirt under her ruffle top you will notice that I have shaded this area. I have also shaded on the left and right sides of the skirt where Marci's legs appear to be under her skirt. This helps to give the impression Marci is sitting down.

For Marci's Hair I began by using Y00 for the main colour all over her hair. I have then highlighted around the head band area, the hair under Marci's ears and at the top of Marci's hair on the left and right starting with Y02. Use Y00 to blend the hair and continue with highlights.

For further highlights and a golden tone I have used Y35. When highlighting Marci's hair I use small flicking/feather strokes. Remember when using this technique to push the Copic brush tip away from you body with each stroke.

Followed by Y26 and Y28 for additional depth and highlights. Which creates a warmth to Marci's hair colour. Making sure in between each application of a new colour I blend with my original Y00. This with remove harsh lines. As you continue slowly Marci is coming to life.
If you stay tuned to my blog in a few weeks I will give a more detailed tutorial on how to colour hair.

The next step is to start with Marci's skin tone. To begin with I use E000 for the all over base colour.

Followed by E00 and E02 to start to create depth and tone in Marci's face and around her knees, shoulders and under her neck area. In between each colour used blend with E000. I continue with these colours until I am happy with the result. I have then used E11 to give a further dimension. BV02 has been used to highlight under the hair line, on the tops of her ears, on top of Marci's shoulders and on the left under her neck. I have also used BV02 on the top of both of Marci's legs. Blending with E00 and E000 as I go to slowly build up Marci's skin colour. Once I am happy with the result I have finished with RV32 on Marci's cheeks and lips. With the cheek area I blend with E000.

You have the option to provide additional shading underneath Marci so it looks like she is sitting on something. However in this case I have not shaded underneath so you could focus on Marci.
In my next tutorials I will cover other more in-depth areas of shading. Including casting shadows.

On my first example I have mounted my Marci stamp as is on a Co ordinated paper from DCWV. I have also used a beautiful green glittered chip board notebook and blue and green embellishments to Co-ordinate with my colour scheme.

Another option you have is to cut the stamped image out and do as I have done and place her sitting on something such as a bench. I particularly like this as it completes the stamped image. I have used foam mounts under both the bench and Marci to make her pop off the page and create more dimension.

Thanks for stopping by! And have a wonderful day!
Hugs Fiona
XXX
No comments:
Post a Comment